Showing posts with label Tag Management. Show all posts
Showing posts with label Tag Management. Show all posts
Create an exit popup with Google Tag Manager & Ouibounce

Have you ever wanted to add one of those popup windows that disable the page content and make you acknowledge an offer when you try and exit? The popups are called 'modal windows' and according to Wikipedia: 'A modal window is a graphical control element subordinate to an application's main window which creates a mode where the main window can't be used'. There are companies that sell exit intent technology, most notably BounceExchange (at $10K per month though it's not cheap). But fear not, this post will show you how to add much of the same functionality using the free and open source JavaScript library from Ouibounce and the free to use Google Tag Manager.
First off: I'm sure exit intent windows can help achieving a conversion goal in certain scenarios, however it's a balancing act between this and not annoying visitors, so you may want to test this over a good period of time and be sure returning visitors aren't negatively influenced. Anyway, back to our modal window example and how to display it when the visitor is about to leave.
Give it a spin!
[Note: this intentionally won't work on on a mobile device] Act as if you're about to leave this page and see it in action, and while you're at it; sign up for my newsletter! The modal window has been set to "aggressive mode" which means you can refresh this page and you can initiate the modal again, non-aggressive mode would use a cookie to only show the popup window once per visitor.
Okay, so now that you've seen it in action - on to the steps:
Step 1: Add Jquery & CSS
Make sure you have jQuery included on your landing page:
<script src="https://ajax.googleapis.com/ajax/libs/jquery/2.1.3/jquery.min.js">
</script>
Now grab the CSS here: http://carlsednaoui.github.io/ouibounce/modal.css and add to your page, this can obviously be adapted to your website brand.
Step 2: Add your hidden modal window
Here's the modal source code taken from the Ouibounce website, you can format however you want however don't change the id or class names, some classes can be omitted, such as the title and footer - so experiment with what you need.
<div id="ouibounce-modal">
<div class="underlay"></div>
<div class="modal">
<div class="modal-title">
<h3>This is a Ouibounce modal</h3>
</div>
<div class="modal-body">
<p>You can style your modal however you want.</p>
<br>
<p>Close this modal by clicking "No Thanks" or outside of the modal.</p>
<form>
<input type="text" placeholder="your@email.com">
<input type="submit" value="learn more »">
</form>
</div>
<div class="modal-footer">
<p>no thanks</p>
</div>
</div>
</div>
Step 3: Create the tag in Google Tag Manager
Go to 'Tags > New' and add the code below then hit Continue and on to the targeting.
// Use the snippet below for including the library or host yourself
<script type="text/javascript" src="https://cdnjs.cloudflare.com/ajax/libs/ouibounce/0.0.11/ouibounce.min.js"></script>

<script type="text/javascript">
// By default "aggressive mode" is set to false, so the option
// below can be removed for one popup per visitor
var _ouibounce = ouibounce(document.getElementById('ouibounce-modal'), {
     aggressive: true});

// Hides the modal when visitor clicks outside of the modal window
$('body').on('click', function() {
     $('#ouibounce-modal').hide();
});

// Hides the modal when visitor clicks on the close / footer link
$('#ouibounce-modal .modal-footer').on('click', function() {
     $('#ouibounce-modal').hide();
});

//  jQuery stuff to keep modal window open when it's meant to
$('#ouibounce-modal .modal').on('click', function(e) {
     e.stopPropagation();
});
</script>
Step 4: Target the modal
URL
I only want this modal window to appear for this blog post so I've created a tag that's triggered on Some Pages which in my case is when the URL contains 'create-exit-popup-with-google-tag'.
Step 5: Create exceptions
DOM ready
We want the tag to fire only when the page is ready and our modal window is accessible so we add a blocking trigger to prevent our tag firing until the Document Object Model is ready.
Excluding mobile
Exit intent detection *isn't supported on mobile* devices and I'm not sure you'd want to do it anyway, to be sure our tag won't fire and to save page load for mobile devices we can exclude our modal window tag by adding some custom JavaScript as a User-defined Variable:
function()
{
    // detect mobile device
    var mobile = navigator.userAgent.match(/Android|BlackBerry|iPhone|iPad|iPod|Opera Mini|IEMobile|webOS/i);

    if(mobile)
    {
        return mobile;
    }
    else
    {
        return "desktop";
    }
}
Once that's saved it can be set as a blocking page view trigger. The above code returns a mobile name when it's a mobile device and the value "desktop" when it's not. So if the value is not "desktop" then this rule will fire and block our modal window code from being executed. Adding the blocking rule and referencing our User-defined Variable, looks like this:
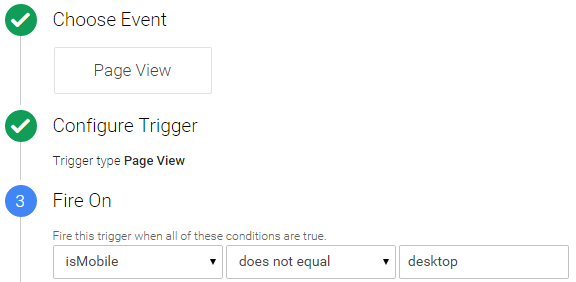
That's everything done, you can now save the tag, QA and publish and you're good to go! Our saved tag with firing triggers looks like this:

Right, that's it - thanks for reading. If you have any comments, questions or feedback please leave them below. And you can follow new posts on Twitter, Email, RSS or by trying to leave this page!
Adobe DTM for improved Target QA

In a previous post I described the options available for Adobe Target QA. Now with DTM there's a much easier/nicer/quicker way of doing this! (This post will take ~2 minutes to read.)
Step 1) Make sure you have the DTM browser plugin installed - it's available for Chrome and Firefox. The plugin allows you to see debug messages but also easily switch between DTM's production and staging environments which is what we want for the purpose of this post. It's worth knowing that you can recreate this functionality with some JavaScript bookmarks, so this can be used for IE or maybe you prefer using bookmarks opposed to the plugin.
Switch staging on bookmarklet:
javascript:localStorage.setItem('sdsat_stagingLibrary',true);
Switch staging off bookmarklet: javascript:localStorage.setItem('sdsat_stagingLibrary',false);
Another approach is to go to your browser's console and add the above commands without "javascript:" ....like this:

Step 2) Create an *unapproved* page load rule in DTM for adding the Mbox. If you're not sure how to do this you can read this post (it's easy).

Step 3) Switch staging to "On" using your browser plugin or bookmarklet and go to the page with the Mbox - unapproved DTM rules are rendered when you have Staging switched on - this is the *magic*. Now hit refresh a couple of times so Adobe Target gets to see the Mbox.
Step 4) Login to Adobe Target and create a campaign using the Mbox that was just created and publish (make live).
Step 5) Go back to the page with the Mbox and start your QA. Once you're sure everything works - publish the Mbox page load rule in DTM.
Easy. Any questions or comments feel free to add below.
Using DTM as your campaign targeting layer

DTM has a whole load of targeting capability which includes being able to target Mboxes. Put another way, DTM can replace your Adobe Target campaign level targeting. So why bother?
Adding targeting at the Mbox level through DTM will reduce your Mbox server calls/costs. In the past if we wanted to run a homepage test for Mac OS visitors we'd burn server calls for 100% of the visitors regardless of their OS, now with DTM as the campaign targeting layer, we're only using server calls for those that match our targeting rules:

Global Mbox strategy
If you're currently using a global mbox it does pose the question whether you'll want to continue as this will undoubtedly be more expensive. The primary reason for adopting a global Mbox strategy was to have the ability to add mboxes to any page through Target opposed to bothering IT, however you can now do this through DTM and it's *significantly* more user-friendly (a marketing person can do it) compared to adding them in Adobe Target. Here's how easy it is in DTM. So I'd recommend you disable the global Mbox in the Marketing Cloud before you download:
When to use Target or DTM
There will be situations that you'll need to define targeting in Adobe Target for example at Experience or success metric level, here's how my responsibility split would look across both systems when creating an optimisation campaign:| DTM | Adding Mboxes, Campaign level targeting (including scheduling). |
| Target | Outputting content, Experience and success metric targeting, defining success metrics. |
Both Adobe DTM and Target are highly complementarity and I'd recommend you give them a spin if you haven't already. Any questions, feel free to ask below.
Remarketing cart abandoners with DTM & Target

I'm going to show you how straightforward it is to target visitors that have abandoned a shopping cart without purchasing, we'll retarget these visitors with personalised homepage content related to what was in their shopping cart, at the same time we'll run an A/B test to report on whether there's uplift. This article will demonstrate how quickly you can implement more advanced testing/targeting that prior to DTM would have involved passing parameters via mboxes and possible intervention from IT. Now with DTM we can do it in no time without having to change any page code!
Step 1) We want to target visitors that had iPhones in their shopping cart for future retargeting, to start with we'll create a 'data element' in DTM that accesses the iPhone product name from the cart, this could just as easily be a SKU/product id or other similar unique identifier. Here's what it looks like in DTM:

This is where we're grabbing the product name from:

Step 2) Now we create a Page Load rule that is triggered when our data element (from previous step) has the value 'apple iphone'. In addition we set a cookie for 30 days - this will be our retargeting window and we'll use this cookie for targeting our personalised homepage content.

And setting the cookie in the 'JavaScript / third party tags' section:
_satellite.setCookie('cart-contents-iphone', 'true', 30);
Step 3) Next we create an mbox named 'homepage-remarketing-iphone' that will wrap the remarketing content, for this example we'll assume it's the main homepage banner. So we create another Page Load rule which targets the homepage URL and we conserve our precious mbox server calls by only outputting when visitors have the 'cart-contents-iphone' cookie value set as 'true'. Prior to DTM we had to burn mbox server calls on 100% of our homepage traffic.


Step 4) Now we login to Target and create a 'Landing Page Campaign' (this forces our targeting to be evaluted every time, A/B would probably work too though). We target the mbox location: 'homepage-remarketing-iphone' and we only want visitors in this campaign that have *not* purchased, so we target our campaign with a custom segment from the 'Marketing Cloud Audiences' target of 'Non-Purchasers':

We'll use default content for the control and personalised iPhone content for the variant. Once this campaign is live we can report on whether our personalised experience is yielding incremental revenue.
What the default content/banner looks like:

And our superduper, optimised & personalised version:

How easy was that?! These type of tests before DTM could have been more of a multi-department project and now it's more like BAU.
Adding mboxes with Dynamic Tag Manager

I'm going to show you how to add Adobe Target mboxes to your pages using DTM. Combining Adobe Target with DTM can take your testing and targeting to the next level. Many organisations have areas that are difficult and time consuming to run tests/ add mboxes, such as the shopping cart. DTM removes all boundaries, in addition the complex and abstract scenarios for evoking an mbox become limitless!
Step 1) First off login to DTM and Adobe Target as a tool - this is available as a predefined option so set-up is a breeze, you have the option for managing the mbox.js file which means you now have control over updating this file. Once added your overview panel will look something like this:

Step 2) For this example I want to target an mbox in the shopping cart where the URL contains "cart".

Step 3) With the Adobe Target tool enabled we now have a new section for adding and naming mboxes. Mbox placement is done by referencing pages elements via the DOM, right-clicking on a page element and using the developer tools enabled with your browser makes this a straightforward process. In the example below I want to change the page title which can be accessed like this: h2.heading.

In total I'll change 3 elements on this page - see below how I'm referencing them:

Step 4) Login to Adobe Target and create a Campaign and Offer referencing the mbox we just created. Those with good eyes will see my new shopping cart title in the HTML offer box below: <h1>Richard's shopping basket - 100% money back guarantee</h1>

Step 5) Once we've created all our variant offers and set our TnT campaign live we can access the cart page again to see the highly optimised version:

When we inspect the page before and after we can observe the differences generated by DTM -
Before:
<h2 class="heading">Your shopping cart</h2>
After:
<div id="_sdsat_mbox_5290797208435833_" style="visibility: visible;
display: block;"><h1 class="heading">
Richard's shopping basket - 100% money back guarantee</h1></div>
You may not agree however I think this is frigging awesome! Many organisations can wait months to get simple tests run in high volume funnels where small conversion gains can make a big difference. A Tag Management System utilised to it's full capability can become more of a "targeting layer" or a Targeting Management System - plain old "Tag" doesn't do it justice.
Testing Adobe DTM using Charles Proxy

I'm going to quickly show you how you can start using all the cool features of Adobe Dynamic Tag Manager in less than 5 minutes. We're going to do this using Charles Proxy, for those of you not familiar with Charles Proxy, it's an HTTP proxy /monitor / Reverse Proxy, one of the coolest features is it's rewriting capability that allows you to "fake" making changes to your live website - this will allow us to add DTM in no time! Prerequisites are that you have Charles Proxy and Dynamic Tag Manager (if you don't have access yet - contact your account manager).
Step 1) Login to DTM and after you have added a new property, go to the "embed" tab to access the Header and Footer code. I'm only using the Production code. It will look something like this for the header:
<script src="//assets.adobedtm.com/cb442236e8fbb669a07de6df8af5f191b2203455/
satelliteLib-aff16ca4897413887b57a00e881397b3ebeb3f42.js"></script>
And the footer:
<script type="text/javascript">_satellite.pageBottom();</script>
Step 2) Next we open Charles Proxy and go to: Tools > Rewrite > Add. From here we rewrite the HTTP response we receive from your website which allows us to add the Header and Footer DTM code whenever we have Charles Proxy open. I've named the rule DTM and added the location which should be your website address.

Step 3) Within the rules section create a "Body" rule where we match the opening head tag of your page and replace with the DTM code and the head tag prepended:

Step 4) Create another "Body" rule and this time we match the closing body tag and replace with the 2nd part of our DTM code and concatenate the closing body tag:

5) If you already have Web Analytics tracking on your page such as a reference to your s_code file, you'll probably want to remove it. In this example we have Adobe Tag Manager (the version prior to DTM), so we'll break the URL and prevent the code from executing:

Finally your DTM rule should look something like this:

Now when we open up your website and as if by magic, when we view your page source we can see the DTM code in the Header and Footer locations we specified, which means hours of endless fun playing with Dynamic Tag Manger. Here's a great place to start learning: https://outv.omniture.com/
Subscribe to:
Posts
(
Atom
)


