Create an exit popup with Google Tag Manager & Ouibounce

Have you ever wanted to add one of those popup windows that disable the page content and make you acknowledge an offer when you try and exit? The popups are called 'modal windows' and according to Wikipedia: 'A modal window is a graphical control element subordinate to an application's main window which creates a mode where the main window can't be used'. There are companies that sell exit intent technology, most notably BounceExchange (at $10K per month though it's not cheap). But fear not, this post will show you how to add much of the same functionality using the free and open source JavaScript library from Ouibounce and the free to use Google Tag Manager.
First off: I'm sure exit intent windows can help achieving a conversion goal in certain scenarios, however it's a balancing act between this and not annoying visitors, so you may want to test this over a good period of time and be sure returning visitors aren't negatively influenced. Anyway, back to our modal window example and how to display it when the visitor is about to leave.
Give it a spin!
[Note: this intentionally won't work on on a mobile device] Act as if you're about to leave this page and see it in action, and while you're at it; sign up for my newsletter! The modal window has been set to "aggressive mode" which means you can refresh this page and you can initiate the modal again, non-aggressive mode would use a cookie to only show the popup window once per visitor.
Okay, so now that you've seen it in action - on to the steps:
Step 1: Add Jquery & CSS
Make sure you have jQuery included on your landing page:
<script src="https://ajax.googleapis.com/ajax/libs/jquery/2.1.3/jquery.min.js">
</script>
Now grab the CSS here: http://carlsednaoui.github.io/ouibounce/modal.css and add to your page, this can obviously be adapted to your website brand.
Step 2: Add your hidden modal window
Here's the modal source code taken from the Ouibounce website, you can format however you want however don't change the id or class names, some classes can be omitted, such as the title and footer - so experiment with what you need.
<div id="ouibounce-modal">
<div class="underlay"></div>
<div class="modal">
<div class="modal-title">
<h3>This is a Ouibounce modal</h3>
</div>
<div class="modal-body">
<p>You can style your modal however you want.</p>
<br>
<p>Close this modal by clicking "No Thanks" or outside of the modal.</p>
<form>
<input type="text" placeholder="your@email.com">
<input type="submit" value="learn more »">
</form>
</div>
<div class="modal-footer">
<p>no thanks</p>
</div>
</div>
</div>
Step 3: Create the tag in Google Tag Manager
Go to 'Tags > New' and add the code below then hit Continue and on to the targeting.
// Use the snippet below for including the library or host yourself
<script type="text/javascript" src="https://cdnjs.cloudflare.com/ajax/libs/ouibounce/0.0.11/ouibounce.min.js"></script>

<script type="text/javascript">
// By default "aggressive mode" is set to false, so the option
// below can be removed for one popup per visitor
var _ouibounce = ouibounce(document.getElementById('ouibounce-modal'), {
     aggressive: true});

// Hides the modal when visitor clicks outside of the modal window
$('body').on('click', function() {
     $('#ouibounce-modal').hide();
});

// Hides the modal when visitor clicks on the close / footer link
$('#ouibounce-modal .modal-footer').on('click', function() {
     $('#ouibounce-modal').hide();
});

//  jQuery stuff to keep modal window open when it's meant to
$('#ouibounce-modal .modal').on('click', function(e) {
     e.stopPropagation();
});
</script>
Step 4: Target the modal
URL
I only want this modal window to appear for this blog post so I've created a tag that's triggered on Some Pages which in my case is when the URL contains 'create-exit-popup-with-google-tag'.
Step 5: Create exceptions
DOM ready
We want the tag to fire only when the page is ready and our modal window is accessible so we add a blocking trigger to prevent our tag firing until the Document Object Model is ready.
Excluding mobile
Exit intent detection *isn't supported on mobile* devices and I'm not sure you'd want to do it anyway, to be sure our tag won't fire and to save page load for mobile devices we can exclude our modal window tag by adding some custom JavaScript as a User-defined Variable:
function()
{
    // detect mobile device
    var mobile = navigator.userAgent.match(/Android|BlackBerry|iPhone|iPad|iPod|Opera Mini|IEMobile|webOS/i);

    if(mobile)
    {
        return mobile;
    }
    else
    {
        return "desktop";
    }
}
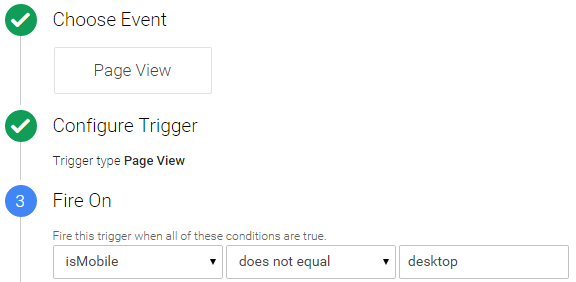
Once that's saved it can be set as a blocking page view trigger. The above code returns a mobile name when it's a mobile device and the value "desktop" when it's not. So if the value is not "desktop" then this rule will fire and block our modal window code from being executed. Adding the blocking rule and referencing our User-defined Variable, looks like this:
That's everything done, you can now save the tag, QA and publish and you're good to go! Our saved tag with firing triggers looks like this:

Right, that's it - thanks for reading. If you have any comments, questions or feedback please leave them below. And you can follow new posts on Twitter, Email, RSS or by trying to leave this page!


